Wednesday, April 27, 2011
Mud Cake
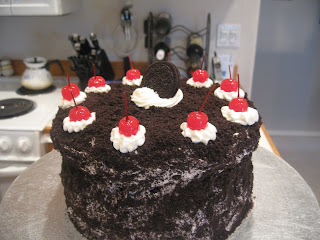
Mud cake is an appropriate title for this cake - it is messy, messy, messy to make! It is also not the best looking in appearance - I like the overall look with the buttercream and the marischino cherries. It reminds me of a black forest cake a little in appearance.
This was a two layer plain white cake. Between the layers, however, I put a layer of chocolate covered cherries. Once the cherries were placed on top of the first layer of cake, I iced them with buttercream. Next time, I think I will try putting them in a cake pan, icing them and then freezing it. It might work better having a solid layer before adding a top cake layer.
The cake was then crumb coated and then frosted with buttercream. Next time I make this cake, I want to try putting a layer of chocolate fudge or ganache over the top of it before I frost. I think that this will enhance the flavor of the cake, but it will also make it easier to frost.
Now the messiest part. If you make this cake - make sure to put wax paper or parchment paper around the bottom of the cake drum. After crushing chocolate sandwich cookies (I used Oreos) just start scooping them onto the buttercream. Try to do this as evenly as possible. I may try putting some of the crushed cookies into the buttercream BEFORE I frost the cake - I wasn't very pleased with how the white showed through. Another thought may be to skip the buttercream entirely and just go with the gananche and top with crushed cookies.
Top it with the dollops of piped buttercream and Maraschino cherries and in the center a large swirl with an Oreo.
This was done for the April office birthday cake - everyone loved the flavor, even those who don't really care for chocolate covered cherries.
Friday, April 15, 2011
Toy Box Cake
An old co-worker asked me to make her baby shower cake. I had seen this cake done in Cakes and Sugarcraft magazine and was anxious to try and replicate it. The original cake was done all in fondant, however my co-worker was having pregnancy cravings for buttercream and asked if it could be replicated in buttercream with fondant accents. I thought - why not. Let's try it an see. I think overall it turned out all right, but I see why it was orignally done in only fondant and that is how I would do this cake if I have the chance to make it again.
The cake is a basic strawberry cake, cut and layered to the approximate shape of a loaf cake. I had spent the three weeks prior to her shower making all the different toys for the cake. My favorite is the little yellow duckies. I covered my cakeboard with chocolate fondant and used an wood impression mat to make it resemble a hardwood floor. The rug is white fondant which I decorated with food markers, once it had dried and hardened.
Once I frosted the cake - I used a ruler to make the wooden plank lines in the sides of the toy box. In the original, this would be strips of dried fondant planks, like the ones on the top of the toy box. I had to use the fondant strips on the edge of the box in order to have the toys hang off of something.
From there is was a matter of placing the toys on the toy box and the lid on top of the toys. Next tip: if you do this with buttercream - let the fondant strip adhere overnight before placing the toys - it may help with the sagging of the box.
Overall - she was very excited about the cake. Her favorite toy was the white bunny and she got her buttercream craving satisfied.
Saturday, April 2, 2011
Ninja's
My nephew has been taking karate lessons this year. So, of course, when it came for Auntie to make his cake he wanted a ninja cake. This cake is actually a compilation of a couple of cakes I found that reflected ninja and karate themes. Because he is in the first grade, I wanted something simple for him. He also had ideas on what he wanted for his cake as well - fortune cookies for the eyes and ninjas. As you can see - the fortune cookies didn't make it on his cake, by his vote.
You remember that I got an airbrush for Christmas. Of course this was the perfect opportunity to play with it and work on shading for a cake. I wanted to blend the colors to make it look like that time of night when dusk falls. The top layer I used as his head and the bottom layer was not only the "body" of the cake, but I also wanted to reflect some of his karate moves too.
I had my nephew show me a couple of his katas and then I sketched them and cut out stencils of them. I then cut them out of black fondant and placed them around the body of the cake. The Asian pagoda was also cut from black fondant and put in the center of the cake. The face was a piece of skin colored fondant with black fondant folded and placed around it. The eyes ended up being fondant instead of the fortune cookies. The Ninja stars were made out of snowflake cookie cutters and a round hole cut out of the center. I painted them with silver luster dust paint (luster dust and vodka).
Overall, I really liked this cake. It turned out very cute and age appropriate for my nephew. He was thrilled and all his friends wanted a cake like his.
Subscribe to:
Comments (Atom)


